Introduction to FreeBSD: pre SANOG VI Workshop: FreeBSD Install
Chapter 2 of the FreeBSD Handbook covers the entire installation process for FreeBSD in much more detail than we'll do here. At this point you should have the FreeBSD Install Disc 1 with you. Now we'll start our install. The steps we take here are to create a fairly minimal install that we'll be updating and adding to during the course of this workshop.
Some Notes
- Some steps have screen captures to help you with the installation process, but not all steps.
- Please read the instructions in this document and on the screen entirely before taking action. If you don't you may make incorrect choices and possibly have to restart the installation process.
- If you are confused about any steps please ask the instructor or assistants for help.
Initial Boot from Install Disc 1
- Turn on the power for your machine.
- Immediately place the first CD-ROM of the FreeBSD 5.3 install set in your machine's CD-ROM drive.
- You'll see an inital boot menu with several choices. The first two choices look something like this:
1. Boot FreeBSD [default]
2. Boot FreeBSD with ACPI disabled
...
- Select the first choice, or just press ENTER.
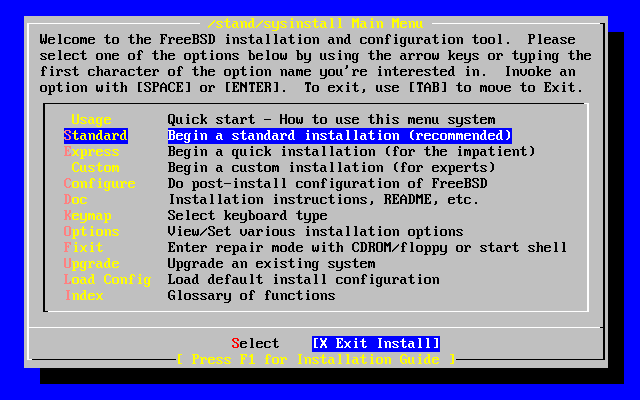
- Now you'll see the Sysinstall main menu. During the week we'll call the Sysinstall utility on several occasions to do further configuration of our FreeBSD installations.
Sysinstall main menu
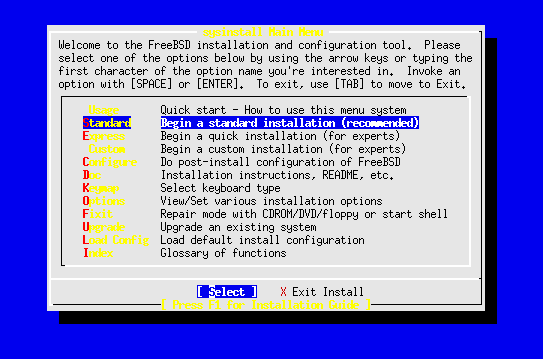
- Move the cursor down by using the DOWN-ARROW and select Standard. The press ENTER to select this choice. As you can see there are quite a number of additional options. Sysinstall not only steps you through installing FreeBSD, but it also allows you to do post-install configuration, such as installing additional software packages and sitributions. In addition you can set keyboard options, view documentation, configure network interfaces, multiple startup options, and so forth.
- Next you'll see a message indicating that you are about to partition your hard drive for a FreeBSD installation. If you have more than one hard drive, then you'll need to indicate which drive to work on. At this point press OK to continue.
- Now you'll see a screen that looks something like this:
Sample FDISK partition screen
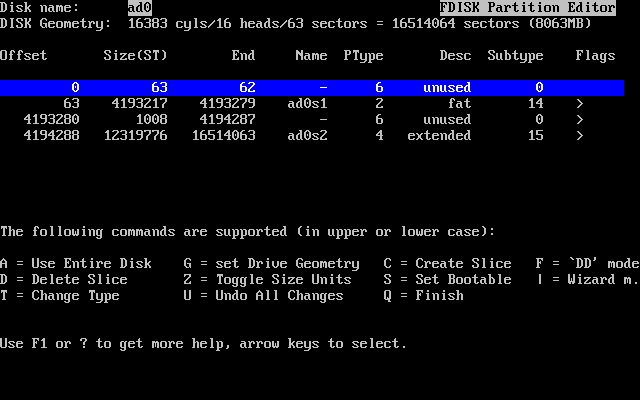
- Assuming you have unused space on your hard drive, then you could highlight this partition and press "C" to Create Slice in this area. For purposes of the workshop we are going to use the entire drive, so press "A" now to use the entire drive for our FreeBSD installation.
- By pressing "A" you should end up with a single FreeBSD slice for the entire drive with the correct filesystem choice of 165 (FreeBSD) chosen.
- Now press "Q" to finish. This is not intuitive, but Q will actually save the information you just entered for use in a few more steps.
- Next you are prompted whether you wish to install a Boot Manager or not. This is an important decision. First here is what this screen looks like:
Sysinstall Boot Manager Menu
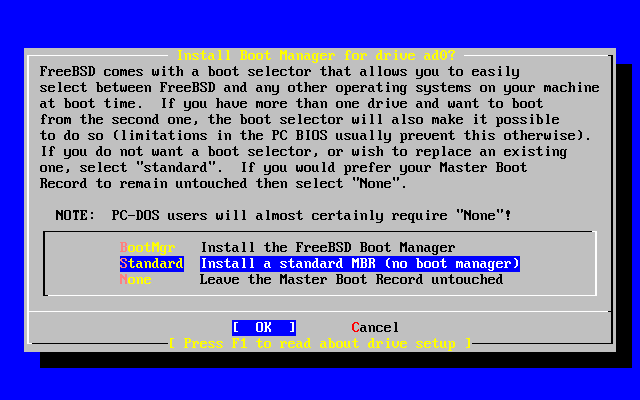
Now here is your decision matrix:
- FreeBSD is the only operating system on your machine: choose "Standard".
- You have additional operating systems (Windows) and you wish to be able to start all of them: possibly choose "BootMgr".
- You have another boot manager installed that can boot FreeBSD (i.e. Grub under Linux!): choose "None".
- As we are going to use the whole hard drive and just install FreeBSD during this workshop you should choose "Standard" at this point and press OK.
- Now it's time to create partitions inside of the disk slice you created for FreeBSD. Press OK to the screen asking you if you want to do this.
- At this point the FreeBSD Disklabel Editor should present itself. Assuming we have used the entire drive on your machine your initial screen should look something like this:
Sysinstall Disklabel Editor
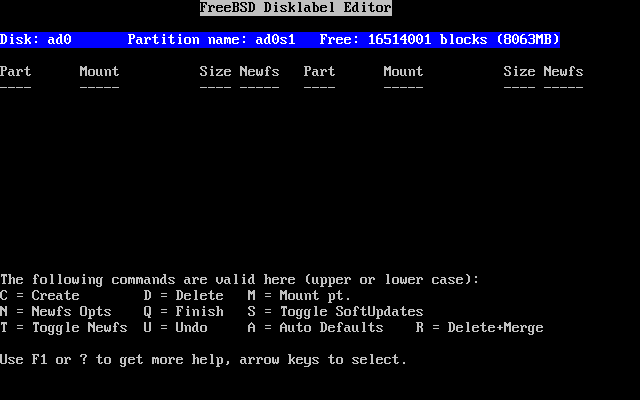
Now it is time to create the various partition we want to use. You instructor will step you through this, but in the end you should have the following sizes chosen:
Partition    Size             Notes
---------    ----             -----
/            512MB            You actually need enough for "/tmp" w/Linux
swap         2xRAM or 256MB   Special type of "swap"
/var         1GB              Lots of software installs here. Needs space.
/usr         6GB              Normally /usr/home is here and more.
/u           Rest of disk     Our convention. Makes updating easier.
Just to see what this might look like when you are done here is a sample disk that has been partitioned. This is what FreeBSD will choose for you if you "A" for Auto Defaults. Remember, ours will be a bit different and you need more space for "/" as we do not have a separate "/tmp" partition.
Remember to follow the instructor's suggestions in class for this section. It's common to make mistakes here and it's easy to fix if you are installing for the first time.
- When you are finished setting up the partitions in your slice, then press "Q" to leave the Disklabel editor.
- Next you'll be asked what distribution set you wish to install. This looks like:
Choose Distributions

For purposes of our workshop you should scroll down and highlight number 6, or "Kern Developer". Press the Space Bar to choose this selection and then press ENTER for "OK".
- Now you'll be prompted if you wish to install the Ports collection. Say "Yes" to this. We'll be using the Ports collection throughout the week to install additional software.
- Now, and this is a bit confusing, you are placed back in the Choose Distributions windows again. At this point you should use the UP-ARROW to move the cursor to the first choice, which is "X Exit". Once highlighted press ENTER to Exit from the menu.
- At this point you asked where your installation media resides. In our case it is on your CD/DVD-ROM drive. The menu prompt looks like this:
Choose Installation Media
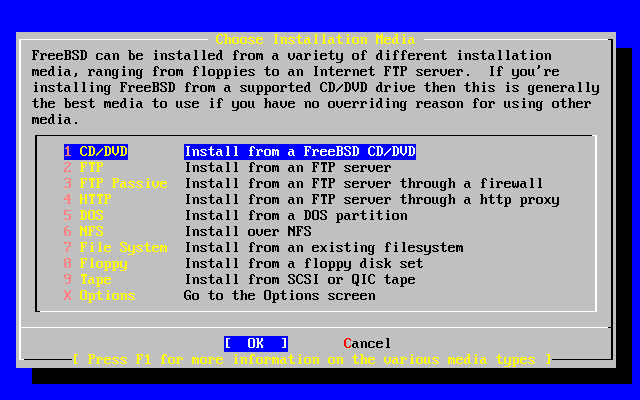
You should leave the first option, CD/DVD highlighted and press ENTER for OK.
- You'll receive a confirmation and last chance warning before proceeding. Up to this point no changes have actually been saved to your disk. You could back out of the installation with absolutely no changes made. But, at this point we are ready to continue so press ENTER for "YES".
FreeBSD is installed!
At this point, technically speaking, FreeBSD is now installed on your machine. You could reboot your computer and FreeBSD would start. However, before doing this the Sysinstall utility gives you the opportunity to configure several important items. All of these items can be configured by hand, but the Syinstall utility has been designed to make this configuration much easier. So, the next 30, or so, steps are post-FreeBSD-installation items that we are going to take care of.
Post Installation
- The first item that will present itself is the Ethernet Device configuration menu. This looks something like:
Ethernet Device Selection
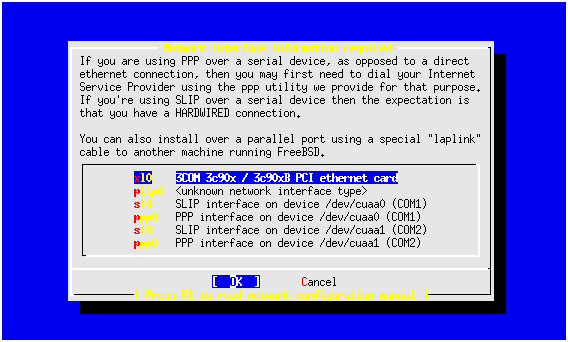
In most cases you should simply press ENTER for "OK" to choose the first device. The FreeBSD kernel is pretty smart about detecting hardware and even smarter about detecting network hardware. Hopefully your network hardware has been correctly detected and is the first item listed.
- Choose "No" when prompted for IPv6 configuration.
- Choose "NO" to DHCP configuration.
- You'll see a network configuration window that looks something like this"
Set Network Configuration for xl0
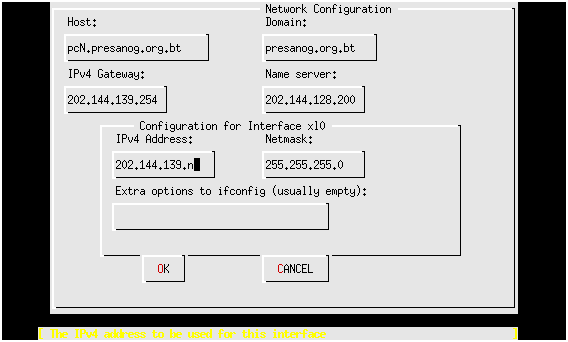
We are going to number our PCs starting from the first PC at the front of the classroom on the right. Thus, the first PC will be named pc1.presanog.org.bt and it will have an IP address of 202.144.139.1. Before you fill in the number for your PC check with the instructor or wait until the instructor gives you your correct IP address.
This means you will be changing:
- pcN.presanog.org.bt
- 202.144.139.n
Fill in the other fields as shown in the image above, then use the tab key to move through each field until you reach "OK", then press ENTER.
- No you'll receive numerous queries about items you can configure. The answers to these are:
- "No" to Network Gateway.
- "No" to inetd. [To be discussed later]
- "No" to ssh. [To be done later]
- "No" to anonymous FTP.
- "No" to NFS server.
- "No" to NFS client.
- "No" to customize console settings.
- When you are prompted to set the timezone say "Yes".
- "Say "No" to the following prompt:
"Is this machine's CMOS clock set to UTC? If it is set to local time or you don't know, please choose NO here!"
- Now you'll see a list of regions for your time zone that looks like this:
Select Your Region (Time Zone)
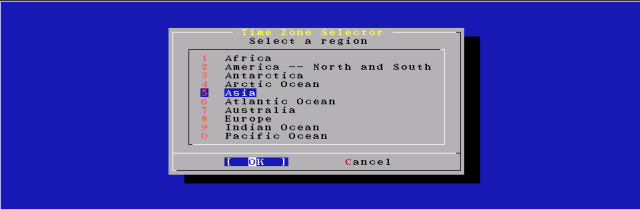
Choose number 5, or "Asia" and press ENTER for "OK".
- In the next list choose "Bhutan" and press ENTER for "OK".
- Respond "Yes" to 'BTT looks reasonable' prompt'.
- "No" to Linux binary compatibility. [To be noted later.]
- "Yes" to PS/2 or Serial Mouse.
- When you see the Select Mouse Protocol type menu, which looks like this:
Select Mouse Protocol
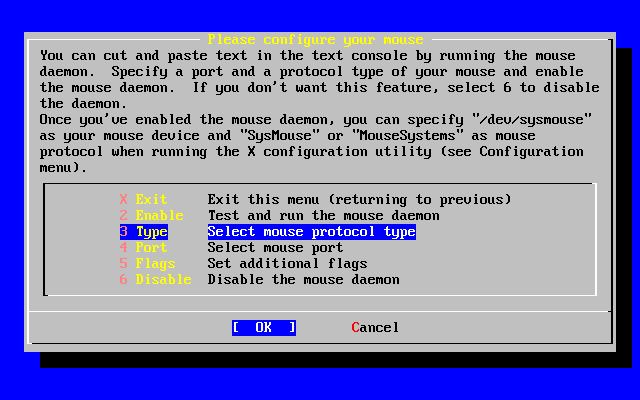
Choose number 2, "Enable" and press ENTER for "OK".
- If you move your mouse and you see the cursor moving on the screen, then press ENTER for "Yes" when asked, "Is the mouse cursor moving?"
- Move the cursor up to X or "Exit" and press ENTER to exit the mouse configuration menu.
- Answer "No" to browsing Package colletion. We'll add more Packages later.
- Answer "No" to adding a user account. We'll add user accounts after installation completes.
- Press ENTER for "OK" to set password for root account.
- The password we are going to use is "san0g2k5" - That's all lower-case letters with the numbers zero (0), 2, and 5. Please use this password and do not change it during the week in case an instructor needs access to your machine to help with exercises. Notice that we have picked a mildly secure password (except that it's printed in a document that will soon be cached for Google searches... :-)).
- When prompted with, " Visit the general configuration menu for a chance to set any last options?" answer "No".
- Now you will be dropped back to the Sysinstall main menu:
Sysinstall Main Menu
Move your cursor to highlight "X Exit Install" at the bottom of the menu (or just press "X"), and press ENTER to exit this menu.
- Answer "Yes" to exit and remove the FreeBSD Disc 1 CD-ROM from your machine's CD-ROM drive as it is rebooting.
After Initial Reboot
At this point you will be staring at your initial logon screen for FreeBSD 5.3, which should looking something like this:
FreeBSD/i386 (pcN.presanog.org.bt) (ttyv0)

login:
Password:
Please move on to the Introduction to FreeBSD exercises that have been handed out for this afternoon.
Last modified: Sat Jan 8 14:06:21 BTT 2005